A Comprehensive Guide to Install Composite DeckingThe Architecture Designs
Are you planning to renovate your home with a new deck? If yes, then you must have certainly checked various options already. You can choose from alternatives such as redwood, cypress, composite, vinyl, cedar, etc.
There are several factors to consider when building an outside deck for your house. Your decision-making process is heavily influenced by cost, durability, and upkeep. However, it is a good idea to research the various outdoor decking materials you have access to before moving further.
Over the past few decades, composite decking has become popular due to its advantages. It is estimated that the composite decking and railing market will reach $9185.5 million by 2030. It is durable, requires less maintenance, is environmentally friendly, available in wide color choices, and allows you to walk barefoot without worrying about splinters.
If you are looking for an option that is cost-effective, sustainable, and safe, then composite decking would be the right choice.
However, the tricky part is installing the composite decking correctly. Without expert guidance, installing a composite deck can be really difficult. We have listed simple steps for your perusal to ensure that you get the composite decking installation done right the first time.
Preparation Before the Actual Installation of Composite Decking
source: pinterest.com
Installing a composite decking is pretty straightforward if you plan your layout accurately and use a solid timber frame base.
You will need specific screws and fasteners to properly fit the deck boards to the frame. Make sure to use the ones that are specifically meant for the job. The boards will have to be acclimatized for a minimum of 72 hours, and then you can use them to install composite decking. It would be wise to lay the boards on the ground sheet when you get them. Also, it is important that you keep them covered.
As a thumb rule, use structural-treated timber always and treat the cut surfaces with two coats of preservatives to make them long-lasting and durable. Sawing should be done using a 90-degree guide marker. It would help you make accurate cuts and remove splinters. You can mark the pilot holes for accuracy in fixings while drilling.
Safety measures must be a priority when you install the composite decking. Use gloves, face masks, and goggles when needed.
Steps to Install Composite Decking
Check out this step-by-step composite decking installation guide for a hassle-free experience:
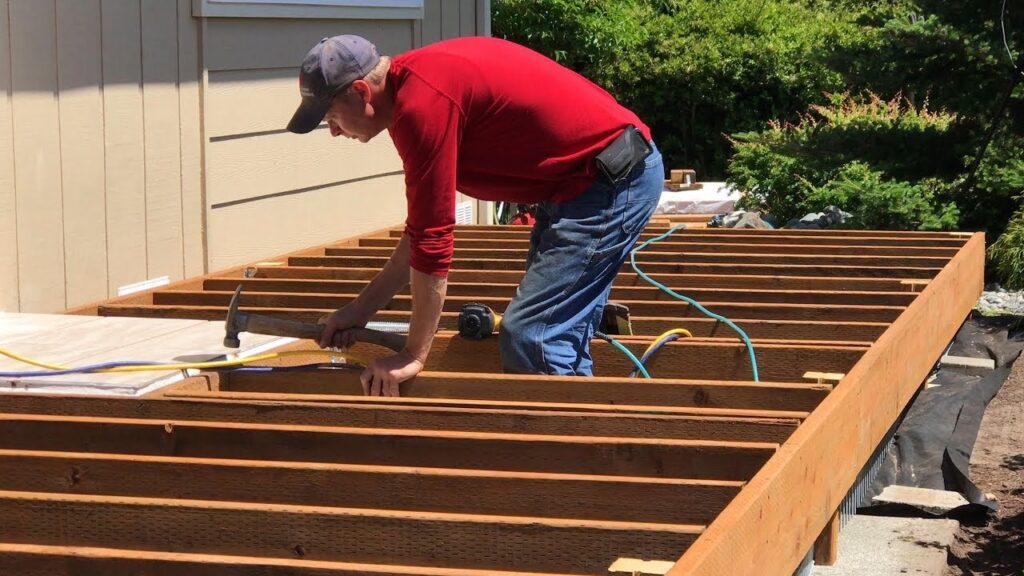
1. Building the frame
source: pinterest.com
Start by laying out your framework once you have taken measurements and ensure that the ground is solid. Now, you can space the composite decking joists to remain evenly apart. Ideally, for a residential house, 16-inch spacing is adequate. However, the 12 to 24 inches range is considered safe for composite decking installation.
Remember that the closer you keep the spacing, the sturdier your frame will be. Also, using strong tick joists would make your deck durable and safe.
Now, you must screw the joists together, as it will keep your frame secure. If you are laying the decking over cement, then the weight of the construction would be sufficient to keep the frame secure. However, it is advisable to fasten the frame by screwing it into the pedestal area.
It is important that you leave a 10mm gap between the ends of the joist and crossbeams. It would allow space for expansion.
2. Laying the first board
First, place your concealed starting clips at the ends of your frame and regular intervals throughout the frame’s joists. Make sure the location of these clips is flat with the edge of your frame because you will be putting your board into them. Starter clips should be screwed into your frame.
Next, you must push the first decking board to fit the starter clips into the side groove. Now, place a unique clip into the exposed side groove of your frame’s joists where the first board meets them.
Secure each of these unique clips to the first board and the joists of the frame from the pre-drilled holes. Use one fastener per board at butt joints, board ends, and each joist, and make sure the screw holes are aligned with the joists’ centers.
3. Laying the remaining composite decking boards
source: pinterest.com
Slide the exposed side grooves of each additional board into the special clips of the previous board. Apply light pressure to ensure that they connect securely. Repeat this process with each additional board, screwing special clips into each edge of the board before sliding it into place. Continue doing this until there are only two additional boards of your decking left to install.
4. Installing final boards
Determine the width of the remaining two boards and check the gaps between them. Now make the joist where the board’s edge would lie. Now, using your marks, screw your concealed starting clips into the tops of the joists of your frame at regular intervals and each end.
Once this is done, you can push the last board against the hidden starter clips and click it into place. You will also have to secure it further by screwing the special clips into the side groove of the board and the joist. Make sure to secure it on the side that faces the other laid decking.
Take your penultimate board and, while holding it at an angle, put one length of it on the last board’s exposed special clips to secure it. Finally, insert your final special clips into the space between the second and third last boards on the other side of your penultimate board, and screw them into place once they are in the middle of each joint.
5. Finish with composite fascia
source: finehomebuilding.com
It’s time to finish by covering up the remaining exposed frame to get a sleek finish. Use composite fascia and cut them into appropriate sizes. Now, screw them at the ends of the frame at even joist intervals.
Concluding Thoughts
The best thing about composite decking is that it is sustainable, rot-resistant, durable, and anti-slip. It is a great alternative to using natural wood. You don’t need to paint composite decking, which would still last decades. Moreover, it saves you money on maintenance compared to using wood. So, use this easy guide and start installing your composite decking.
The post A Comprehensive Guide to Install Composite Decking appeared first on The Architecture Designs.